Webpush (Chrome & Firefox & Opera)
Specifications
There are two variants of the Webpush:
-
with UI = UI Mode
-
without UI = Headless Mode
UI Mode
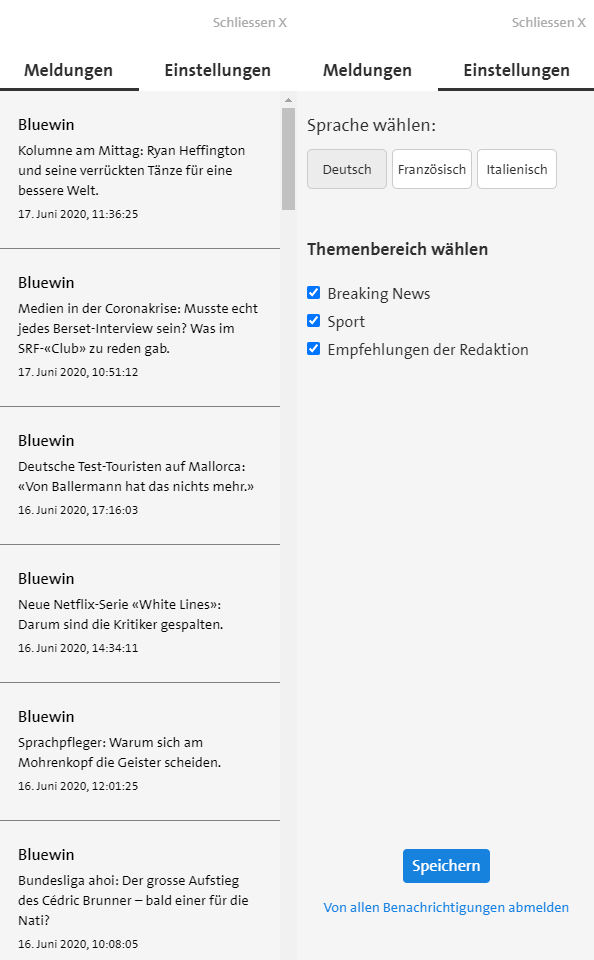
The UI Mode has a sidebar button, which will show a sidebar on the left side of the screen after clicking on the icon. In one tab it shows archived messages, if received any. The messages can be opened and will lead to the detailed page on the Website. In the other tab, it is possible for the user to select languages and the corresponding tags to that language. There subscribing and unsubscribing to these tags can be handeled.
Headless Mode
The Headless Mode has no sidebar button and no sidebar. It only provides the possibility to subscribe without choosing any tags, after subscribing the user receives Webpushes in the browser.
Permissions
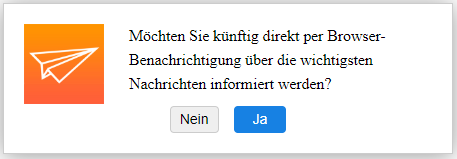
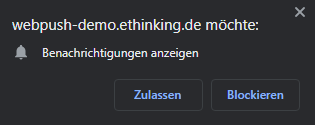
If a User visits the Website with a supported browser, at first a modal window opens which asks if the user wants to subscribe for Notifications on that Website. This triggers the Browser Prompt requesting for permisson which the user has to allow.
-
If the user has given permission to the modal window and the browser prompt he is subscribed.
-
If the user has not allowed the modal:
-
It is possible to trigger it again through clicking on the sidebar button (UI Mode)
-
It will reappear with the next pageload (Headless Mode)
-
-
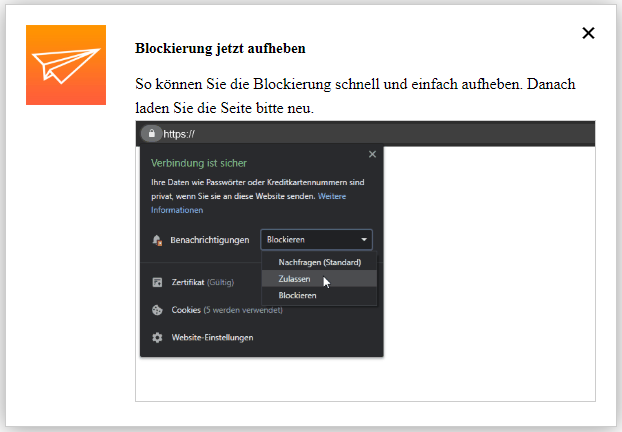
If the user has blocked the browser permisson he then manually has to unblock the permission in the browser and change it to "Allow" (Webpushes will be received) or "Ask" (permission process continues from start).
Instruction for this will be shown in the Unblocking Modal. The unblocking modal will appear with every pageload in Headless Mode or when clicking on the sidebar button in UI Mode.
Tags / Subscription
Headless Mode
If a user has given permission to the Webpush without UI he will be automatically subscribed to all default tags that are stated in the background. There is no possibility to unsubscribe or change subscriptions without manipulating the browser.
UI Mode
If a user uses the Webpush with UI, he has the possibility to individually subscribe and unsubscribe to tags. If the user is not registered yet and he subscribes via the sidebar button he will be automatically subscribed to all default tags which he can change after in the sidebar. If a user is not registered yet but subscribes through a button in the content, he will not be automatically subscribed to default tags but only for the tag he registered for. After registration via content button the sidebar opens and shows his saved registration.
Technical dependencies
The Webpush uses the following browser functionalities:
Local Storage
We save a unique deviceID wih the Key "pushDelivery.device" in the Local Storage of the browser, which is needed to adress the individual browser.
Every browser normally has its own deviceID so if a user is subscribed to one page with three browsers he will receive 3 Webpushes according to the three different subscriptions.
Also it can happen if different profiles are used in on one browser (for example Google Chrome) multiple Webpushes can be received in one browser in case the different profiles have subscribed independently to the same page.
IndexedDB
If UI Mode with message archive is used the received messages will be stored in the browsers IndexedDB in the database "ethinking-notification".
Service Worker
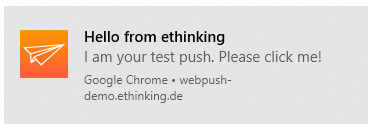
The Service Worker listens in the background and if an incoming Webpush is received, it is shown on the screen.
It is mandatory that the Service Worker file is hosted in the root of the website (for example www.mywebsite.com/service-worker.js). Otherwise the functionality does not work.
Firebase credentials
For sending Webpushes, we use Firebase as a carrier to the client. Push.Delivery is sending to Firebase and Firebase distributes the Webpushes to the client.
For that, it is necessary to have individual Firebase credentials for every project. The following credentials are needed:
-
Firebase Server Key
-
Firebase Sender ID
-
apiKey
-
projectId
-
messagingSenderId
-
appId
How to register for Firebase and retrieve the needed credentials can be read in this handout: https://docs.push.delivery/guides/How-to-setup-your-Firebase-credentials.pdf
Glossary
Sidebar Button
The sidebar button is a part of the UI Mode and triggers the modal window for initial subscription and opens the sidebar.

Modal
The modal window is the first step for enabling notifications. It can appar automatically when the user visits the website (Headless Mode) or can be triggered via the sidebar button (UI Mode).
Browser Prompt
If the user accepts the modal then the browser prompt appears and asks the user if they want to enable notifications for this website or not.
Sidebar
In the UI Mode the user can open the sidebar through the sidebar button. It gives the user the possibility to view his last 50 received pushes or change his settings for tags.
Unblocking Modal
The unblocking modal shows up, if the users browser has blocked notifications automatically (Headless Mode) or when the users browser has blocked notifications and he clicks on the settings button (UI Mode).
Setup Webpush in Admin UI
Please go into the "Apps" tab and add a new App.
Give your App a name, e.g. "My website Webpush".
Then select the platform "Web Push (Chrome and Firefox)".
Upload an icon for the channel. This is only used inside the Push Admin so that you easier can recognize the channels by image.
Also it is required to use a Push template. This template is used to define the information that will be sent with the Webpush.
You can use this default template and modify it to your individual needs:
[
  {
    "operation": "shift",
    "spec": {
      "message":"message",                              (1)
      "document_id":"document_id",                      (2)
      "*": "&"
    }
  },
  {
    "operation": "default",
    "spec": {
      "customFields": {
      },
      "firebasePushType": "data",
      "timeToLive": "1800",                             (3)
      "icon":"https://www.mywebsite.de/images/logo.jpg",(4)
      "title":"Your Webpush title goes here",           (5)
      "delayWhileIdle": "false"
    }
  }
]
| 1 | The "message" attribute is responsible for carrying the text of the Webpush. |
| 2 | The "document_id" attribute is responsible for the URL of the Webpush. |
| 3 | Through the "timeToLive" atribute you can define how long the Webpush will be hold active if the user has not received it, e.g. because the computer has not active internet connection. The expected input format is seconds. So in our example the Webpush will stay active for 30 Minutes. Please consider that a high value may result in many notifications after immediately turning on the computer, which might be annoying for the users. |
| 4 | With the "icon" attribute you can link to your logo, which will be shown in the notification from the browser. |
| 5 | "title" is used to give your notifications a static title, e.g. your company name. |
| To learn more about how to create and modify JOLT templates please follow up in our developer documentation: push-templates |
At the end, you will be asked for an API Key. Here you need to enter your Firebase API Key that you received when creating a new Web App in Firebase.
Please follow up this document to learn how to get your credentials from Firebase.
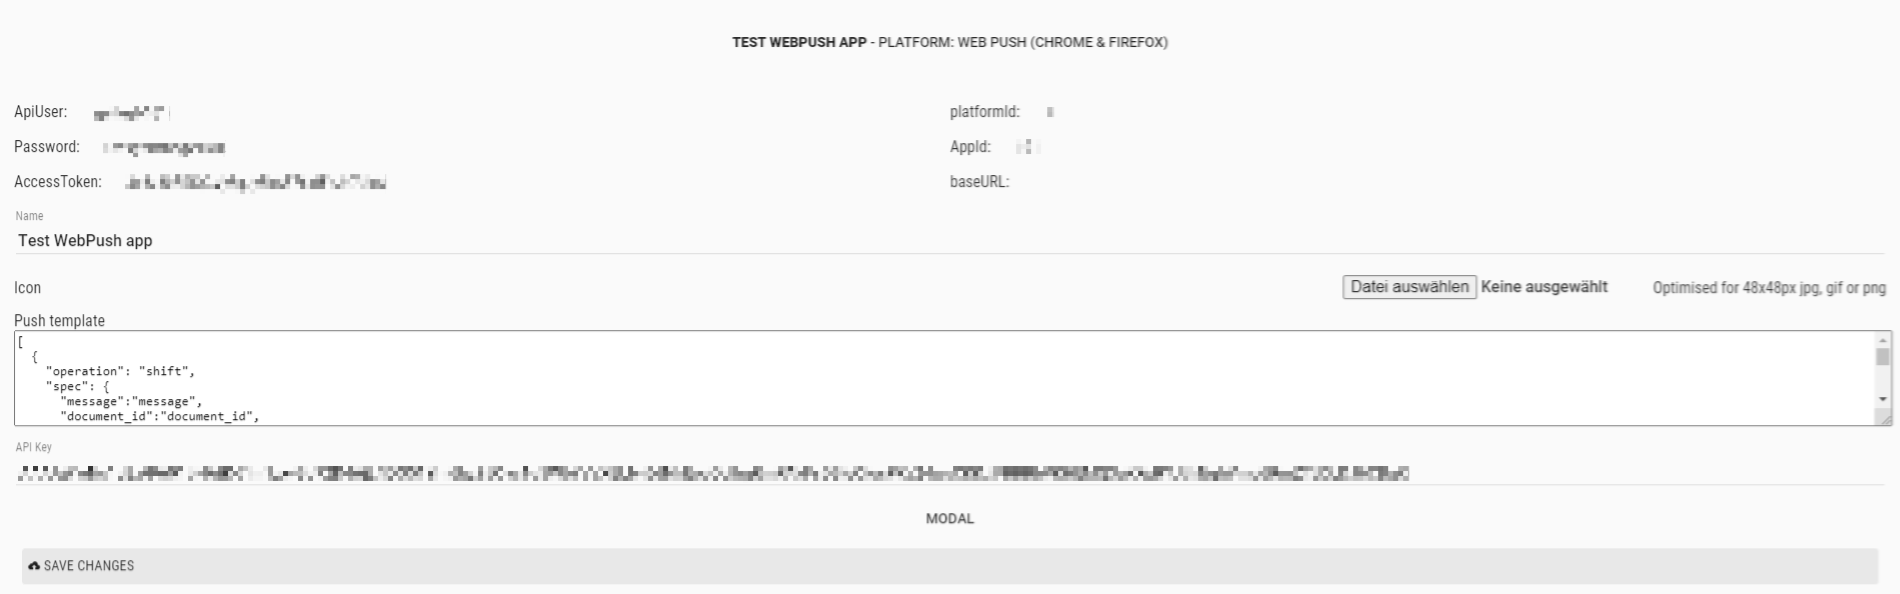
After sucessfully creating the App for Webpush the following information will be automatically shown inside the App:
-
ApiUser: This is the API username.
-
Password: This is the password for the API user.
-
AccessToken: Instead of using username and password an Acess Token is created. This token is needed for your Webpush configuration via the embed code.
-
platformId: The platform ID is needed for your Webpush configuration via the embed code.
-
AppId: The App ID is needed for your Webpush configuration via the embed code.
After setting up the App now it is time to create Tags that users can register for.
Setup the Webpush library
Step 1 - Check the delivered files
You should have received a .zip file which includes two JavaScript files:
-
webpush.js
-
service-worker.js
The "webpush.js" brings all the webpush functionality and configuration. The "service-worker.js" is needed for the browser to listen in the background, if a Webpush has been received.
If a file is missing or the archive might be broken, please get back to us. If everything is there as it should, please proceed to step 2.
Step 2 - Upload the files to your website
For uploading the files to your website you possibily need a FTP client.
The "webpush.js" can be placed anywhere you like in your file structure. Please write down or copy the path to that file, you will need it soon again.
The "service-worker.js" must be placed in the root of your website. Therefore the path should be like "www.mywebsite.de/service-worker.js". This is mandatory, otherwise the Webpush can not be received by the client.
Step 3 - Complete the embed code with your individual settings
For implementing the Webpush, you need to place an embed code in the frontend of your website. But before you need to alter and complete it with your individual data.
This is the default embed code:
<script src="Your path to the webpush library goes here"></script>      (1)
<script type="text/javascript">
   window.addEventListener('load', () => {
  let config = {
    'app': {
      'client': {
        'defaultUrl': 'Your website goes here',                         (2)
        'autosubscribe': false,
        'defaultSubscribedTags': 'Your IDs go here',                    (3)
      },
      'api': {
        'id': 'Your App ID goes here',                                  (4)
        'platformId': 'Your Platform ID goes here',                     (5)
        'baseUrl': 'Your Push.Delivery base URL goes here',             (6)
        'accessToken': 'Your access token goes here'                    (7)
      },
      'firebase': {
        'projectId': 'Your Firebase Project ID goes here',              (8)
        'apiKey': 'Your Firebase API Key goes here',                    (9)
        'appId': 'Your Firebase App ID goes here',                      (10)
        'messageSenderId': 'Your Firebase Sender ID goes here',         (11)
        'serviceWorkerPath': 'Youre Service Worker path goes here',     (12)
      },
    },
  };
    push = new PushDelivery(config);
    if (push.isSupportedBrowser()) {
        pushUI = new PushDeliveryUI(config);
        pushUI.init();
    }
});
</script>| 1 | This is the path to your uploaded "webpush.js". |
| 2 | This is the complete URL of your website, e.g. https://www.mywebsite.de |
| 3 | Here you can define the tagIDs of your tags that the user should be subscribed by default. How to create tags and where to find the IDs is explained here. |
| 4 | This is the AppID of the webpush channel in Push.Delivery. This information can be accessed in the Webpush App in your Push Admin. |
| 5 | This is the Platform ID in Push.Delivery. This information can be accessed in the Webpush App in your Push Admin. |
| 6 | This is the base URL of your account in Push.Delivery. This will be provided to you by ethinking in the onboarding process and will most likely look like: https://<your-company-name>/push.delivery |
| 7 | This is your access token for authentification with Push.Delivery. This information can be accessed in the Webpush App in your Push Admin. |
| 8 | This is your Firebase Project ID. If you do not have this, please refer to this guide to find out how to receive your Firebase credentials. |
| 9 | This is your Firebase API Key. If you do not have this, please refer to this guide to find out how to receive your Firebase credentials. |
| 10 | This is your Firebase App ID. If you do not have this, please refer to this guide to find out how to receive your Firebase credentials. |
| 11 | This is your Firebase Sender ID. If you do not have this, please refer to this guide to find out how to receive your Firebase credentials. |
| 12 | This is the path to your "service-worker.js". As described above it will be like https://www.mywebsite.de/service-worker.js |
When you collected all your information and credentials, please insert them into the embed code.
Step 4 - Place the embed code into your website
After completing the embed code with your individual settings, it’s time to place the embed code to your website.
Place it into an area where it can be accessed with all page loads, e.g. the <head> area.
And that is it!
If you followed all these steps, your Webpush should work and with the next pageload your visitors can subscribe and you will be able to send Push messages to their browser.
Customization of your Webpush
As the Webpush library comes by default with a general configuration, it is possible to customize some parts for your individual needs.
This can also be done in the embed code. Any changes inside that will override the part in the default configuration.
Customizations can be added at the end of the script and should be wrapped into the following snippet:
'ui': {

Your Customization snippets go here.

  };
Any styles will be applied by the CSS of your website. So if you want any different styling you can do this within your own CSS.
Customizing the modal
If you want to change the image inside the modal you can use this snippet:
'template': {
            'modal': {
                'logo': 'https://www.mywebsite.de/your-logo.jpg'
                }
            }
This will globally change the image and it will also appear in the Unblocking Modal
If you want to change the text inside the modal or the text within the buttons, the following snippet can be used:
'translations': {
      'de': {

          'askForPermissionsDialog': {
              'label_description': 'Your description goes here',
              'button_confirm': 'Your confirmation text goes here',
              'button_deny': 'Youre denial text goes here'
          },
The 'de' indicates that these changes will apply for the German language only. To find out more about language support and handling please follow up here.
Customizing the unblocking modal
To change the texts and the GIFs inside the unblocking modal please use the following snippet (if you already inserted text changes as seen above you can directly begin the snippet from 'howToUnblockDialog'):
'translations': {
      'de': {
          'howToUnblockDialog': {
              'image': {
                  'chrome': 'https://push.delivery.ethinking.de/ethinking/gifs/unblock-chrome-italian.gif',
                  'firefox': 'https://push.delivery.ethinking.de/ethinking/gifs/unblock-FF-italian.gif'
              },
              'label_title': 'Your unblocking title goes here',
              'label_description': 'Your unblocking description goes here'
          },
      },
      },
Note that the Webpush library has an automatic recognition if the user has Chrome or Firefox browser. That is why the there is a field for 'chrome' and 'firefox'. As the animated GIFs are specifically made for these browsers we do not recommend to change these but however it is possible to do that if you want to replace them by your individual image or GIF.
Customizing the sidebar
Sidebar button
If you want to change the image of the sidebar button you can achieve this through this snippet (if you already did changes in the logo as seen above you can directly begin the snippet from 'bell'):
'template': {
            'bell': {
                'image': 'https://www.yourwebsite.de/images/your-image.svg'
            }
        }
Sidebar
If you want to change the text inside the sidebar you can use this snippet (if you already inserted text changes as seen above you can directly begin the snippet from 'settings'):
'translations': {
            'de': {
                'settings': {
                    'label_subscribed': 'Your text for subscribed info goes here',
                    'label_blocked': 'Your text for unblocked status goes here',
                    'label_subscribe': 'Your text for subscribing goes here.'
                },
                'sidebar': {
                    'message_list_empty': 'Your text for empty archive goes here',

                    'tab_notification': 'Your title for message archiv goes here',
                    'tab_settings': 'Your title for settings goes here',

                    'label_language': 'Your text for language label goes here',
                    'label_description': 'Your text for label description goes here',
                    'label_tag_selection': 'Your text for tag selection goes here',

                    'button_unsubscribe': 'Your text for unsubscribing goes here',
                    'button_save': 'Your text for saving goes here',
                    'button_close': 'Your text for closing the sidebar goes here'
                },