Overview
To support different push platform engines an template engine system is needed which provide the transformation of a common push message into the platform target format. The data exchange format uses the json format so the template engine must support json to json transformation like XSLT for XML.
Push template engine jolt
The template engine uses the jolt project to provide a common Transfrom DSL see https://github.com/bazaarvoice/jolt and https://docs.google.com/presentation/d/1sAiuiFC4Lzz4-064sg1p8EQt2ev0o442MfEbvrpD1ls/edit?usp=sharing .
Transform DSL
Example
{
    "title": "title",
    "message": "message",
    "articleId": "123",
    "url": "http://test.de/123",
    "pushID": "1234567"
}[
{
"operation": "shift",
"spec": {
"title": "customFields.title",
"message": "customFields.subtitle",
"url": "customFields.url",
"pushID": "customFields.pushId",
"articleId": "collapseKey"
}
},
{
"operation": "default",
"spec": {
"customFields": {
"feedId": "blick.directpush.testfeed.1",
"regId": "123"
},
"timeToLive": "1800",
"delayWhileIdle": "false"
}
}
]-
Result JSON
{
  "collapseKey" : "123",
  "customFields" : {
    "feedId" : "http://test.de/feed/1",
    "pushId" : "1234567",
    "regId" : "123",
    "subtitle" : "message",
    "title" : "title",
    "url" : "http://test.de/123"
  },
  "delayWhileIdle" : "false",
  "timeToLive" : "1800"
}
Android json push format
-
Push format JSON
{
    "collapseKey": "123",      (1)
    "delayWhileIdle": "false", (2)
    "timeToLive": "1800",      (3)
    "customFields": {          (4)
        "field1": "value1",
        "field2": "value2",
        "fieldX": "valueX"
    }
}
| 1 | GCM setting collapseKey |
| 2 | GCM setting delayWhileIdle |
| 3 | GCM setting timeToLive |
| 4 | entry point for custom fields |
Note: The Server Key obtained from GCM should be configured in App→ API Key
IOS push input format
For the alert, two different fields can be used: alert and alertObj. Here alert will in fact set only the alert body text, where alertObj can have title and body text specified. Only one of the two should be used. The silent flag is optional.
-
Push format JSON
{
    "alert": "title",        (1)
    "alertObj": {            (2)
        "title": "alert title",
        "body": "alert body"
    },
    "badge": "0",            (3)
    "sound": "default",      (4)
    "silent": true,          (5)
    "rich": true,            (6)
    "customFields": {        (7)
        "field1": "value1",
        "field2": "value2",
        "fieldX": "valueX"
    }
}
| 1 | APNS setting alert message |
| 2 | APNS setting alert title and message |
| 3 | APNS setting badge |
| 4 | APNS setting sound |
| 5 | APNS setting content-available (optional) |
| 6 | APNS setting mutable-content (optional) |
| 7 | entry point for custom fields |
Note: The Keystore(Certificate)/Key(Token) obtained from APNS should be configured in App→ Keystore(Certificate)/Key(Token)
Firebase push input format
-
Push format JSON
{
    "collapseKey": "123",      (1)
    "delayWhileIdle": "false", (2)
    "timeToLive": "1800",      (3)
    "customFields": {          (4)
        "field1": "value1",
        "field2": "value2",
        "fieldX": "valueX"
    }
}
| 1 | FCM setting collapseKey |
| 2 | FCM setting delayWhileIdle |
| 3 | FCM setting timeToLive |
| 4 | entry point for custom fields |
Note: The Server Key obtained from FCM should be configured in App→ Server Key
Web-browser (Chrome, Firefox, etc.) push input format
Api key for app is a GCM/FCM server key (required for Chrome push and for other browsers which use GCM, e.g. Opera).
Example transform template:
[
  {
    "operation": "shift",
    "spec": {
      "url": "data.url",
      "*": "&"
    }
  },
  {
    "operation": "default",
    "spec": {
      "icon": "icon.png",
      "data": { "url": "http://push.delivery" },
      "requireInteraction": "true"
    }
  }
]
This template transforms "url":"link" to "data":{url:"link"} (as required for notification options),
writes all other key-value pairs as is and adds default elements to resulting json.
The API for showing a notification in browser (javascript):
<ServiceWorkerRegistration>.showNotification(<title>, <options>);Title and options could be declared and used as following:
const notificationTitle = 'Title';
const notificationOptions = {
    "title":"eThinking Push Demo",
    "body": "Body text line 1 \n Body text line 2",
    "data": { "url": "http://push.delivery" },
    ...
};
...
self.registration.showNotification(notificationTitle, notificationOptions);
Thus if the above described template and demo service worker (see source code) are used,
then the outgoing json should contain following options:
The list of common notification options:
* title - notification's title
* body - notification's body text
* icon - url to icon image
* image - url to body image
* url - url will opened in a new window by click on the notification
* requireInteraction - if true, then the notification will not disappear until user action
* badge - small monochrome icon
* actions - array of actions / buttons (see example 2)
Other options:
* timestamp
* sound
* vibrate
* dir
* tag
* renotify
* silent
More options and info on https://developer.mozilla.org/en-US/Add-ons/WebExtensions/API/notifications/NotificationOptions
and https://developers.google.com/web/fundamentals/push-notifications/display-a-notification
Example push message 1 ( title, icon, body and image ):
{
    "title":"eThinking Push Demo",
    "icon":"icon.png",
    "url":"http://push.delivery",
    "body":"Good morning!",
    "requireInteraction":"true",
    "image":"https://imageUrl"
}
notification view in Chrome:
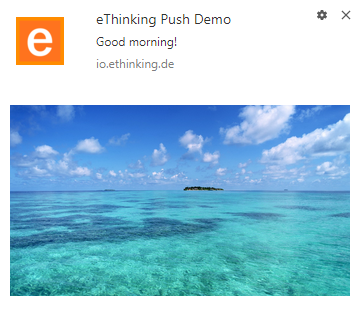
"Image" and "Require interaction" options work only in Chrome at the moment (tested on Google Chrome 60, Firefox 55, Opera 47). An "Image" option requires "https" url.
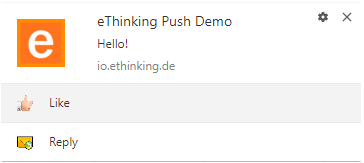
Example push message 2 ( title, icon, body and buttons ):
{
    "title":"Demo title",
    "icon":"iconFile.png",
    "body":"Hello!",
    "requireInteraction":"true",
    "actions": [
       {"action": "like", "title": "Like", "icon": "https://example/like.png"},
       {"action": "reply", "title": "Reply", "icon": "https://example/reply.png"}
    ]
}
notification view in Chrome:
Actions should be handled in service worker:
self.addEventListener('notificationclick', function (event) {
    event.notification.close();
    let clickResponsePromise = Promise.resolve();
    if (event.action === 'like') {
        clients.openWindow("http://...");
    }
    else if (event.action === 'reply') {
        clients.openWindow("http://...");
    }
    event.waitUntil(Promise.all([clickResponsePromise]));
});